Archive for the ‘beginner’ Category

Introducing website satisfaction by Google Consumer Surveys

Webmaster level: all

We’re now offering webmasters an easy and free way to collect feedback from your website visitors with website satisfaction surveys. All you have to do is paste a small snippet of code in the HTML for your website and this will load a discreet satisfaction survey in the lower right hand corner of your website. Google automatically aggregates and analyzes responses, providing the data back to you through a simple online interface.

Users will be asked to complete a four-question satisfaction survey. Surveys will run until they have received 500 responses and will start again after 30 days so you can track responses over time. This is currently limited to US English visitors on non-mobile devices. The default questions are free and you can customize questions for just $0.01 per response or $5.00 for 500 responses.

Survey Setup and Code Placement Tips

To set up the survey code, you’ll need to have access to the source code for your website.

  1. Sign into Google Consumer Surveys for website satisfaction to find the code snippet.
  2. You have the option to enter the website name and URL, survey timing, and survey frequency.
  3. Click on the “Activate survey” button when ready.
  4. Once you find the code snippet on top of the setup page, copy and paste it into your web page, just before the closing </head> tag. If your website uses templates to generate pages, enter it just before the closing </head> tag in the file that contains the <head> section.

If  you have any questions, please read our Help Center article to learn more.

Posted by Marisa Currie-Rose

Verify your site in Webmaster Tools using Google Tag Manager

Webmaster level: Intermediate

If you use Google Tag Manager to add and update your site tags, now you can quickly and easily verify ownership of your site in Webmaster Tools using the container snippet code.

Here’s how it’s done:

1. On the Webmaster Tools home page, click Manage site for the site you’d like to verify, then select Verify this site. If you haven’t added the site yet, you can click the Add a site button in the top right corner.

To do this, you must have “View, Edit, and Manage” account level permissions in Google Tag Manager.

2. On the Verification page, select Google Tag Manager as the verification method and follow the steps on your screen.

3. Click Verify.

And you’re done!

If you’ve got any questions about this verification method, drop by the Webmaster Help Forum.

Posted by , Webmaster Trends Analyst

Getting started with structured data

Webmaster level: All

If Google understands your website’s content in a structured way, we can present that content more accurately and more attractively to Google users. For example, our algorithms can enhance your search results with “rich snippets” when we understand that your page is a structured product listing, event, recipe, review, or similar. We can also feature your data in Knowledge Graph panels or in Google Now cards, helping to spread the word about your content.

Today we’re excited to announce two features that make it simpler than ever before to participate in structured data features. The first is an expansion of Data Highlighter to seven new types of structured data. The second is a brand new tool, the Structured Data Markup Helper.

Support for Products, Businesses, Reviews and more in Data Highlighter

Data Highlighter launched in December 2012 as a point-and-click tool for teaching Google the pattern of structured data about events on your website — without even having to edit your site’s HTML. Now, you can also use Data Highlighter to teach us about many other kinds of structured data on your site: products, local businesses, articles, software applications, movies, restaurants, and TV episodes. Update: You can see the full list of schemas supported in Data Highlighter here.

To get started, visit Webmaster Tools, select your site, click the “Optimization” link in the left sidebar, and click “Data Highlighter”. You’ll be prompted to enter the URL of a typically structured page on your site (for example, a product or event’s detail page) and “tag” its key fields with your mouse.
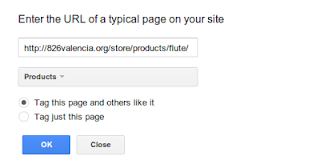
Google Structured Data Highlighter

The tagging process takes about 5 minutes for a single page, or about 15 minutes for a pattern of consistently formatted pages. At the end of the process, you’ll have the chance to verify Google’s understanding of your structured data and, if it’s correct, “publish” it to Google. Then, as your site is recrawled over time, your site will become eligible for enhanced displays of information like prices, reviews, and ratings right in the Google search results.

New Structured Data Markup Helper tool

While Data Highlighter is a great way to quickly teach Google about your site’s structured data without having to edit your HTML, it’s ultimately preferable to embed structured data markup directly into your web pages, so your structured content is available to everyone. To assist web authors with that task, we’re happy to announce a new tool: the Structured Data Markup Helper.

Like in Data Highlighter, you start by submitting a web page (URL or HTML source) and using your mouse to “tag” the key properties of the relevant data type. When you’re done, the Structured Data Markup Helper generates sample HTML code with microdata markup included. This code can be downloaded and used as a guide as you implement structured data on your website.

Structured Data Markup Helper

The Structured Data Markup Helper supports a subset of data types, including all the types supported by Data Highlighter as well as several types used for embedding structured data in Gmail. Consult schema.org for complete schema documentation.

We hope these two tools make it easier for all websites to participate in Google’s growing suite of structured data features! As always, please post in our forums if you have any questions or feedback.

Posted by Justin Boyan, Product Manager

Using schema.org markup for organization logos

Webmaster level: all

Today, we’re launching support for the schema.org markup for organization logos, a way to connect your site with an iconic image. We want you to be able to specify which image we use as your logo in Google search results.

Using schema.org Organization markup, you can indicate to our algorithms the location of your preferred logo. For example, a business whose homepage is www.example.com can add the following markup using visible on-page elements on their homepage:


<div itemscope itemtype="http://schema.org/Organization">
<a itemprop="url" href="http://www.example.com/">Home</a>
<img itemprop="logo" src="http://www.example.com/logo.png" />
</div>

This example indicates to Google that this image is designated as the organization’s logo image for the homepage also included in the markup, and, where possible, may be used in Google search results. Markup like this is a strong signal to our algorithms to show this image in preference over others, for example when we show Knowledge Graph on the right hand side based on users’ queries.

As always, please ask us in the Webmaster Help Forum if you have any questions.

Posted by RJ Ryan, Google Engineer

The Webmaster Academy goes international

Webmaster level: All

Since we launched the Webmaster Academy in English back in May 2012, its educational content has been viewed well over 1 million times.

The Webmaster Academy was built to guide webmasters in creating great sites that perform well in Google search results. It is an ideal guide for beginner webmasters but also a recommended read for experienced users who wish to learn more about advanced topics.

To support webmasters across the globe, we’re happy to announce that we’re launching the Webmaster Academy in 20 languages. So whether you speak Japanese or Italian, we hope we can help you to make even better websites! You can easily access it through Webmaster Central.

We’d love to read your comments here and invite you to join the discussion in the help forums.

Posted by Giacomo Gnecchi Ruscone, Search Quality

Easier management of website verifications

Webmaster level: All

To help webmasters manage the verified owners for their websites in Webmaster Tools, we’ve recently introduced three new features:

  • Verification details view: You can now see the methods used to verify an owner for your site. In the Manage owners page for your site, you can now find the new Verification details link. This screenshot shows the verification details of a user who is verified using both an HTML file uploaded to the site and a meta tag:

    Where appropriate, the Verification details will have links to the correct URL on your site where the verification can be found to help you find it faster.

  • Requiring the verification method be removed from the site before unverifying an owner: You now need to remove the verification method from your site before unverifying an owner from Webmaster Tools. Webmaster Tools now checks the method that the owner used to verify ownership of the site, and will show an error message if the verification is still found. For example, this is the error message shown when an unverification was attempted while the DNS CNAME verification method was still found on the DNS records of the domain:

  • Shorter CNAME verification string: We’ve slightly modified the CNAME verification string to make it shorter to support a larger number of DNS providers. Some systems limit the number of characters that can be used in DNS records, which meant that some users were not able to use the CNAME verification method. We’ve now made the CNAME verification method have a fewer number of characters. Existing CNAME verifications will continue to be valid.

We hope this changes make it easier for you to use Webmaster Tools. As always, please post in our Verification forum if you have any questions or feedback.

Posted by Pierre Far, Webmaster Trends Analyst

We created a first steps cheat sheet for friends & family

Webmaster level: beginner

Everyone knows someone who just set up their first blog on Blogger, installed WordPress for the first time or maybe who had a web site for some time but never gave search much thought. We came up with a first steps cheat sheet for just these folks. It’s a short how-to list with basic tips on search engine-friendly design, that can help Google and others better understand the content and increase your site’s visibility. We made sure it’s available in thirteen languages. Please feel free to read it, print it, share it, copy and distribute it!

We hope this content will help those who are just about to start their webmaster adventure or have so far not paid too much attention to search engine-friendly design. Over time as you gain experience you may want to have a look at our more advanced Google SEO Starter Guide. As always we welcome all webmasters and site owners, new and experienced to join discussions on our Google Webmaster Help Forum.

Posted by Kaspar Szymanski, Search Quality Strategist, Dublin

New first stop for hacked site recovery

Webmaster Level: All

We certainly hope you never have to use our new Help for hacked sites informational series. It’s a dozen articles and over an hour of videos dedicated to helping webmasters in the unfortunate event that their site is compromised.


Overview: How and why sites are hacked

If you have further interest in why cybercriminals hack sites for spammy purposes, see Tiffany Oberoi’s explanation in Step 5: Assess the damage (hacked with spam).


Tiffany Oberoi, a Webspam engineer, shares more information about sites hacked with spam

And if you’re curious about malware, Lucas Ballard from our Safe Browsing team, explains more about the topic in Step 5: Assess the damage (hacked with malware).


Lucas Ballard, a Safe Browsing engineer, and I pretend to have a totally natural conversation about malware

While we attempt to outline the necessary steps in recovery, each task remains fairly difficult for site owners unless they have advanced knowledge of system administrator commands and experience with source code. For helping fellow webmasters through the difficult recovery time, we’d like to thank the steady members in Webmaster Forum. Specifically, in the subforum Malware and hacked sites, we’d be remiss not to mention the amazing contributions of Redleg and Denis Sinegubko.

How to avoid ever needing Help for hacked sites
Just as you focus on making a site that’s good for users and search-engine friendly, keeping your site secure — for you and your visitors — is also paramount. When site owners fail to keep their site secure, hackers may exploit the vulnerability. If a hacker exploits a vulnerability, then you might need Help for hacked sites. So, to potentially avoid this scenario:

  • Be vigilant about keeping software updated
  • Understand the security practices of all applications, plugins, third-party software, etc., before you install them on your server. A security vulnerability in one software application can affect the safety of your entire site
  • Remove unnecessary or unused software
  • Enforce creation of strong passwords
  • Keep all devices used to log in to your servers secure (updated operating system and browser)
  • Make regular, automated backups of your site

Help for hacked sites can be found at www.google.com/webmasters/hacked. We look forward to not seeing you there!

Written by Maile Ohye, Developer Programs Tech Lead

A reminder about selling links that pass PageRank

Webmaster level: all

Google has said for years that selling links that pass PageRank violates our quality guidelines. We continue to reiterate that guidance periodically to help remind site owners and webmasters of that policy.

Please be wary if some…

Make the most of Search Queries in Webmaster Tools

Level: Beginner to Intermediate

If you’re intrigued by the Search Queries feature in Webmaster Tools but aren’t sure how to make it actionable, we have a video that we hope will help!


Maile shares her approach to Search Queries in Webmaster Tools

This video explains the vocabulary of Search Queries, such as:

  • Impressions
  • Average position (only the top-ranking URL for the user’s query is factored in our calculation)
  • Click
  • CTR

The video also reviews an approach to investigating Top queries and Top pages:

  1. Prepare by understanding your website’s goals and your target audience (then using Search Queries “filters” to support your knowledge)
  2. Sort by clicks in Top queries to understand the top queries bringing searchers to your site (for the given time period)
  3. Sort by CTR to notice any missed opportunities
  4. Categorize queries into logical buckets that simplify tracking your progress and staying in touch with users’ needs
  5. Sort Top pages by clicks to find the URLs on your site most visited by searchers (for the given time period)
  6. Sort Top pages by impressions to find valuable pages that can be used to help feature your related, high-quality, but lower-ranking pages

After you’ve watched the video and applied the knowledge of your site with the findings from Search Queries, you’ll likely have several improvement ideas to help searchers find your site. If you’re up for it, let us know in the comments what Search Queries information you find useful (and why!), and of course, as always, feel free to share any tips or feedback.

Written by Maile Ohye, Developer Programs Tech Lead